Knitting can help to pass the time while traveling. Socks are a good project for this purpose, as they are are compact both in the materials you need to carry and in the space you need to work in. You also end up with incredibly comfortable socks. While you might be tempted to use them for daily wear, I recommend reserving hand-knitted socks for those times when you want to relax and perhaps put your feet up. Even when you use a sock yarn that includes some nylon for durability, hand-knitted socks will wear out faster than those produced by modern factories.
The first time you knit socks, I recommend choosing a time and place where you can fully concentrate on your knitting. Also, if you are just learning to knit, I suggest starting with easier projects, such as scarves and hats, before you take on socks. Socks like the ones pictured here are easy to knit, once you get the hang of it, but they require a comfort with circular knitting and paired decreases. They are best as a project for those ready to transition from beginner to intermediate level of knitting.
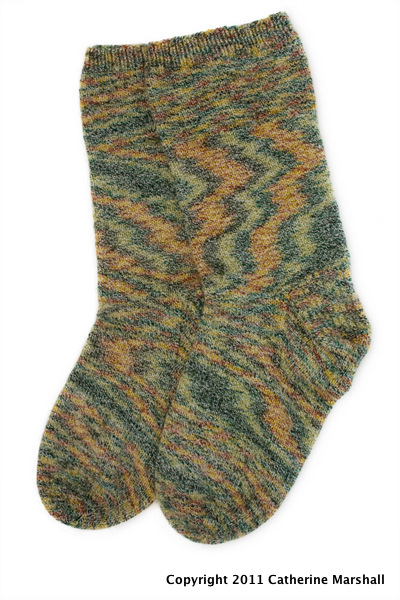
Like many sock patterns, this one calls for “sock yarn.” While you can use any yarn of similar weight, you will get the best results by using a yarn designed to be resilient, durable, and comfortable against the skin. The yarn specified in the pattern below is 41% cotton, 39% wool, 13% nylon, and 7% elastic. The elastic allows the yarn to stretch and retain its shape, which a yarn with this much cotton would not do otherwise. As this is a hand-painted yarn, each sock will look a bit different. In general, though, this yarn produces spirals and pools of colors rather than stripes.
The pattern below produces a stretchy sock that should fit most adult feet.
MATERIALS
Patons Stretch Socks Ombres, Olive – 2 skeins
1 set double point or 2 sets circular needles, US #2
2 stitch markers to fit needles
PATTERN
Part 1 – The Leg
Cast on 80 stitches in Color A using slingshot method on two needles held together.
Rows 1-10: Work single rib.
Rows 11-40: Work in stockinette
Row 41: Dec 4 sts evenly so that 76 sts remain
Rows 42-100: Work in stockinette
Part 2 – The Heel
Heel Flap
Row 1: K 19 onto other needles, turn
Row 2: P 38, transfer remaining sts to holder
Rows 3-38: Repeat Rows 1 & 2.
Turn Heel
Row 1: K 21, SSK, K1, turn
Row 2: Slip 1 pwise, P5, P2tog, P1, turn
Row 3: Slip 1 pwise, K to 1 stitch before gap, SSK (one stitch from either side of gap), K1, turn
Row 4: Slip 1 pwise, P to 1 stitch before gap, P2tog (one stitch from either side of gap), P1
Repeat rows 3 & 4 until all heel sts have been worked, ending with a WS row, and ending p2tog if there are not enought sts to end p2tog , p1.
There will be 22 stitches remaining on your working needles (and 38 stitches still on the holder)
Heel Gusset
Knit across all heel stitches with one circular needle (Needle 1)
Pick up 19 stitches by knitting in the back loop of the chain edge stitches on the first side of the heel flap (Note: knitting in the back loop will twist the stitch and create a tighter fabric at the join)
Place a stitch marker on the needle
Pick up 1 stitch
Still using Needle 1, K19 from stitch holder
Switching to the second circular needle (Needle 2), K19 to take remaining stitches from holder
Pick up 1 stitch
Place a stitch marker on the needle
Pick up 19 stitches by knitting in the back loop of the chain edge stitches on the second side of the heel flap
Still using Needle 2, K11 (half the heel stitches) from Needle 1
There are now 98 stitches, and the heel stitches are now divided between the two needles
First Gusset Row
On Needle 1, K to 3 stitches before marker, K2tog, K1, transfer marker, K2tog, K to end of Needle 1
On Needle 2, K to 2 stitches before marker, K2tog, transfer marker, K1, SSK, K to end of Needle 2
Second Gusset Row
K around
Round 1
On Needle 1, K to 3 stitches before marker, K2tog, K1, transfer marker, K to end of Needle 1
On Needle 2, K to marker, transfer marker, K1, SSK, K to end of Needle 2
Round 2
K around
Repeat Rounds 1 and 2 until there are 76 sts
Part 3 – The Foot
K around until piece measure 8″ from back of heel, or about 2″ less than desired total foot length
Part 4 – The Toe
Round 1
On Needle 1, K to 3 stitches before marker, K2tog, K1, transfer marker, K1, SSK, K to end of Needle 1
On Needle 2, K to 3 stitches before marker, K2tog, K1, transfer marker, K1, SSK, K to end of Needle 2
Round 2
K around
Repeat Rounds 1 and 2 until there remain 40 stitches
Repeat Round 1 only until there remain 12 sts
K 6 stitches from Needle 1 onto Needle 2
Transfer 6 stitches from the back end of Needle 2 onto Needle 1
Cut yarn leaving a 4″ tail
Graft stitches from two needles together using Kitchner stitch