Nyhavn means “New Harbor.” The harbor referred to is an extension that was dug out around 1670 to allow ships to sail in from the sea and unload directly at Kongens Nytorv. Today this canal houses a number of museum ships, as well as privately owned veteran wooden ships. The street along the water is lined with colorful townhouses from the 17th and 18th century, which currently house shops, restaurants, and bars. At the end of the street, where Nyhavn meets the main harbor, are two historically preserved warehouses, originally used by the East India Company, now functioning as a hotel. Don’t leave Copenhagen without getting a look at Nyhavn!
I got this recipe from my mother back when I was still a student. The first time Dan and I made this fudge, we let it boil too long and thus destroyed an enameled saucepan at the home of a former president of Yale University (where we were house sitting while the family vacationed at Martha’s Vineyard.) So I recommend using a candy thermometer.
2/3 c. powdered cocoa 1 3/4 c. sugar 1/8 t. salt 1 1/2 c. milk 1/4 c. butter 1 t. vanilla
Combine the cocoa powder, sugar, and salt. Place these in a heavy saucepan, and slowly stir in the milk. Using medium heat and stirring continually, bring the mixture to a boil. Keep the mixture at a slow boil, without stirring, until is reaches the soft ball stage (235° F) Remove from heat, then add butter and vanilla without stirring. Cool at room temperature to about 110° F. Beat by hand until the fudge just begins to lose some of its gloss. Spread quickly into a lightly buttered 8-inch square pan. When it has completely cooled and set, cut into squares.
Notes:
I like this fudge for the intensity of its chocolate flavor and for its texture, in which you can detect the crystallization of the sugar.
As you beat the fudge, it will begin to thicken. Once the fudge begins to lose its gloss, you need to get it into a pan quickly before it becomes too stiff to work with.
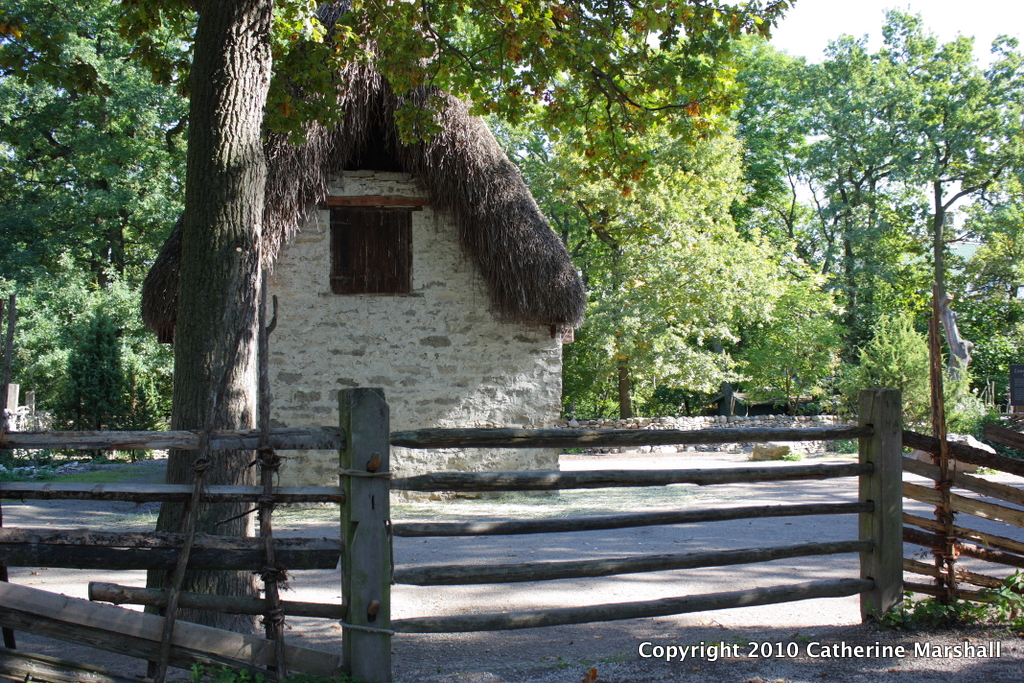
Skansen is a large (approximately 75 acre) open air museum and zoo located on the island of Djurgården (as is the Vasa Museum). During our half-day visit, we did not expect to see it all, but we were able to walk around most of it. Skansen has buildings, exhibits, and activities that show what Swedish life was like in different parts of the country at various points in the past. Actual buildings from the times and places represented have been transported and kept in their historic state. The countryside areas include farmsteads, cottages, animal shelters, a manor, a flax mill, a fulling mill, a chipping house, a bakehouse, a blacksmith’s workshop, village halls, a church, and a school. In addition, there is a Finn settlement and a Sami camp in the countryside area.
The photo left shows a traditional stone barn with thatched roof. Such buildings were used to shelter animals during harsh winter weather. Many of the cottages and farmhouses we saw in the countryside area also had thatch or turf roofs. If you’re interested in learning more about the construction of traditional Swedish farmhouses, you should check out a webpage on The History of Swedish X-joint Log Houses by Hans Högman.
The photos above show the interior of a countryside cottage. As you enter, you are in a room used for cooking and laundry. This room contains a small table, used for food preparation, and a large laundry cauldron that is heated from below by a wood file. Behind the laundry cauldron is a large, wood-fired oven. The middle room, a bit of which can be glimpsed through the first doorway, functioned as a sitting room and bedroom. Through the next doorway is a workroom with a floor loom.
The town area is reconstruction of a Swedish town from mid-19th century, again with original buildings, most of which are occupied by working craftsmen or guides in historic costume and role. To the right and below are photos from an historic bakery, where bread and rolls fresh from the oven were available for sampling. Within the town area, we also saw work underway in the pottery, glassworks, and furniture factory. In addition we visited the engineer works, the goldsmith’s shop, the ironmonger’s house, the tinsmith’s workshop, the herb garden (where tobacco was being dried), and the general store.
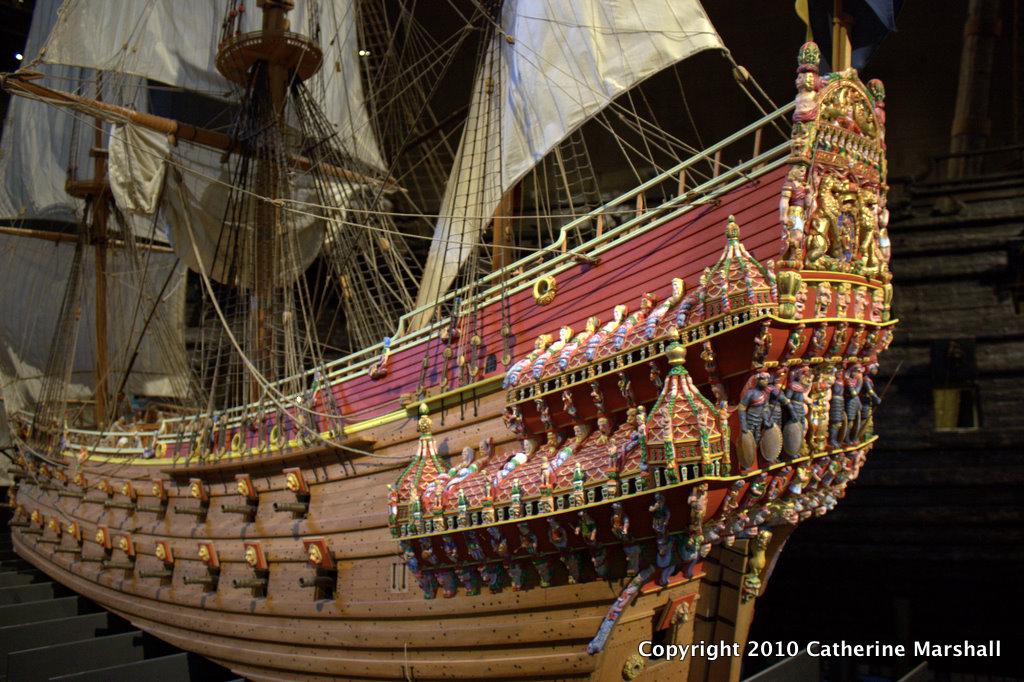
Located on the island of Djurgården, this museum was built to display the Vasa, a Swedish warship that sunk in 1628 and was then recovered in 1961. In addition to being the only ship of its era still in existence, the fascinating stories of its sinking and recovery make the Vasa a unique attraction. The architecture of the museum and it’s well-designed exhibits further enhance the experience.
The museum is built around the recovered ship, which was too large for me to take in with a photograph. The action of water and time have aged the timbers and worn away the paint which once decorated this ship. Much of the rigging has been reconstructed, but not the sails. The photo above shows a small model of the Vasa reconstructed with sails intact and painted as it might have looked on the fatal day of its launch and sinking. There are exhibits explaining the research that went into determining the composition and coloring of the paint originally used on the Vasa, as well as descriptions of the materials and construction techniques used for shipbuilding and sailmaking during the period.
If you want to learn more about the Vasa and its stories, I encourage you to visit the Vasa Museet website.
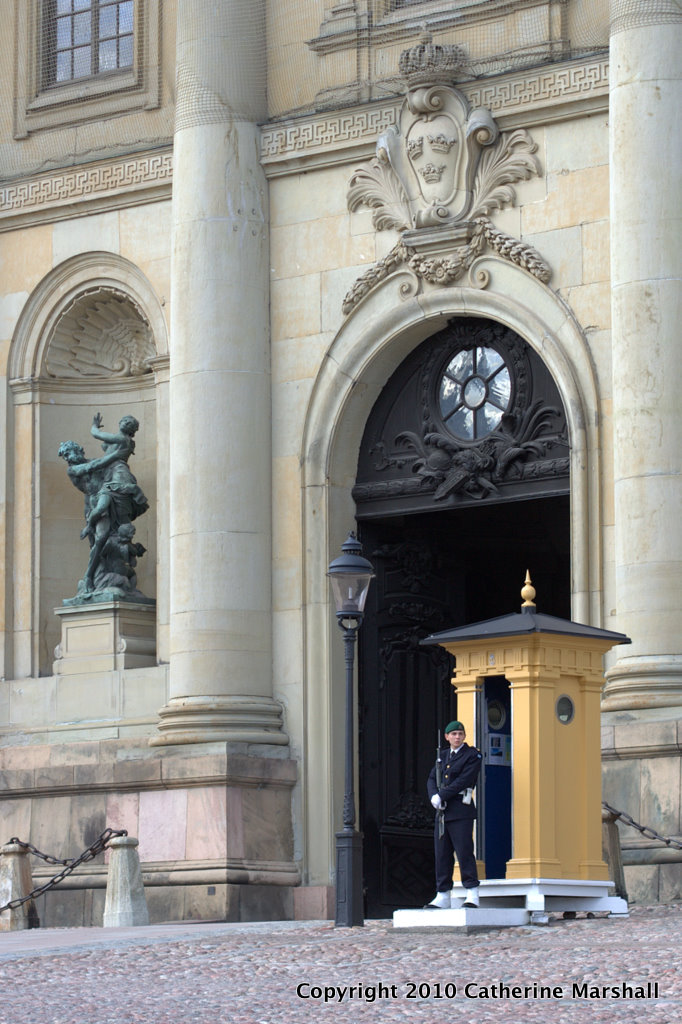
The city of Stockholm began as a settlement on the central island of Stadsholmen. The area comprising this island and several smaller adjacent islands is now known as Gamla Stan. Walking along the cobbled streets of the “old town,” with their interesting shops and restaurants, was one of the highlights of our trip. We also enjoyed visiting the Royal Palace (Kungliga slottet), which houses several museums, and the historic church Storkyrkan.
The photo above left shows a side entrance to the Royal Palace. The photo above right is of a side chapel in Storykyrkan featuring Ljusgloben (Light Globe) by Torolf Engström and a stained glass window that is modern in comparison with the others found in the church.
There are many variations of filling for caggionetti, though the base seems to nearly always be ceci beans, chestnuts, or — most traditionally — a combination of the two. These are soft-cooked and then mashed together with the other ingredients. Most recipes also include cocoa powder, grated chocolate, or melted chocolate. Sweetness is provided by sugar, honey, or grape must. Other common ingredients are chopped nuts, candied citron, orange zest, and cinnamon.
After looking at various recipes and doing some experimentation, I’ve come up with my own version of caggionetti:
PASTRY INGREDIENTS 4 c. all-purpose flour 2/3 c. olive oil 2/3 c. white wine 1 1/2 tsp. baking powder pinch of salt cold water as needed
FILLING INGREDIENTS 5 oz. cooked ceci beans 2 Tbs. cocoa powder 1 tsp. instant espresso coffee powder 1/4 c. brown sugar 1/2 c. powdered sugar 3 oz. semi-sweet chocolate, grated or melted 2-3 oz. chopped walnuts 1/2 c. candied citron 1/2 – 1 c. chopped walnuts (2-3 oz.) 2 tsp. ground cinnamon 1/8 tsp. ground cloves 1/8 tsp. cayenne pepper 1/2 tsp. orange oil zest from one orange
Purée the ceci beans in a food processor, then add the other filling ingredients, processing as needed to evenly distribute. Set the filling aside.
Combine the flour, baking powder, and salt. Add the oil and wine, then knead, adding the cold water as needed to get a dough that holds together. Knead he dough for several more minutes to make sure the ingredients are well blended. On a lightly floured cutting board, roll out the dough as thin as you can get it. Cut out circles, place about 1/2 t. of filling on each circle, then fold over and seal the edges as you would a ravioli. Fry the cookies in hot Canola oil, turning once, until both sides are lightly browned. Remove to a plate or tray lined with paper towels for draining. Sprinkle with sugar while still hot.
While these are sometimes referred to as “thumbprint” cookies, I call them “jam dots” because I use something other than a thumb to make the indentation that the jam goes into.
3/4 c softened butter 1/2 c sugar 1 egg 2 tsp vanilla 1 3/4 c flour 1/4 t salt 1 c finely chopped nuts (optional)
Preheat the oven to 375 degrees F (190 degrees C).
Mix together the flour and salt.
In a medium bowl, cream together the butter, sugar, egg, and vanilla.
Mix in flour a little bit at a time, then (optionally) add the chopped nuts. Mix until the ingredients are distributed and a soft dough has formed. Do not overmix.
Refrigerate the dough 15-30 minutes to firm it up.
Roll dough into 3/4 inch balls.
Place balls 2 inches apart on an air-cushion cookie sheet lined with parchment paper.
Use a round instrument to make a deep well in the center of each cookie and fill with ~1/4 teaspoon of preserves.
Bake for 15 to 17 minutes in the preheated oven, until the cookies just begin to brown.
Transfer from cookie sheets to rack for cooling.
Notes:
A. Adding chopped nuts results in a shorter and more tender crumb. Without the nuts, the cookies are tasty and sturdy. Making some dough with nuts and keeping some plain vanilla will add to the variety of a holiday tray.
B. I use the rounded end of a plastic honey server to make the jam wells. Making an even indentation helps to keep the jam from running over the edges.
C. I use air-cushion cookie sheets for these cookies because its difficult otherwise to bake the cookie through to the center without over browning the bottoms.
D. Even after setting up, the jam centers can be a bit sticky. Drizzling chocolate in thin stripes across the cookie tops will help to keep them from sticking together, as well as giving decorative flair.
1 cup peanut butter (crunchy or smooth) ½ to ¾ cup sugar (the lesser amount is necessary for crunchy peanut butter) 1 egg 1 teaspoon vanilla extract
Combine peanut butter, sugar, egg, and vanilla until well blended. Shape into 1” balls (or use 2 tsp scoop) onto an ungreased cookie sheet. Flatten balls in a crisscross pattern with a fork, or to make thumb-print cookies to fill with ganache.
Bake 8-14 minutes at 350º or until golden. Makes about 24 cookies.
NOTES
A. Use a mixer to combine the ingredients, but take care not to mix too long – the dough becomes stiffer as it is mixed.
B. Air-cushion baking sheets work well for these. They allow more even browning without the bottoms overbaking. Using these, allow 12-14 minutes for baking.
This is a personal website created and managed by Cath Marshall. While this website is designed primarily for viewing by friends and family members, anyone is welcome to view and use this website as provided in the website’s Terms of Use.